

How To Upload And Edit A Video For Youtube
Editing your YouTube videos is like putting the finishing touches on a presentation.
Editing doesn't simply mean removing unnecessary scenes or splicing two bits of video together. It's about enhancing the audition's watching feel by making information technology easier to follow what y'all are saying.
So you lot've started a YouTube channel and are gear up to start publishing videos.
Today, I'll evidence how to use YouTube Studio (the congenital-in YouTube Video Editor) and other video editing tools to edit your YouTube videos before uploading them.
Let's become started.
Disclosure: I may receive affiliate compensation for some of the links below at no cost to you if you decide to buy a paid plan. You can read our affiliate disclosure in our privacy policy.
Things to Consider Before Editing your YouTube Video.
When you are about to edit videos, there are certain things that you have to have into consideration.
1. Write your Script and Shoot the Video With Editing in Mind.
One of the most important things to continue in mind while editing is how you lot will be using the video. For example, if you are embedding the YouTube video to your blog, ensure there is enough time between when the audience reads the text and when they run across the video.
Plus, you can't always control how groovy your footage will look. Sometimes the lighting and sound won't be ideal. Other times you may demand to invest in some lights and other equipment. For these reasons, you should shoot your video with editing in mind.
2. Choose the Correct Editing Tools.
You've got not bad footage and ideas in your head about how to cutting information technology together. Then you outset editing and realize you need some video editing software.
Using the right video editing tools can help yous create professional-sounding videos with amend audio quality and speed up the process.
Whether you use them to brand videos for your blog or other marketing purposes or to edit professional videos, you need to know your options and which ones are suitable for your needs.
When looking for a video editing solution, consider these things:
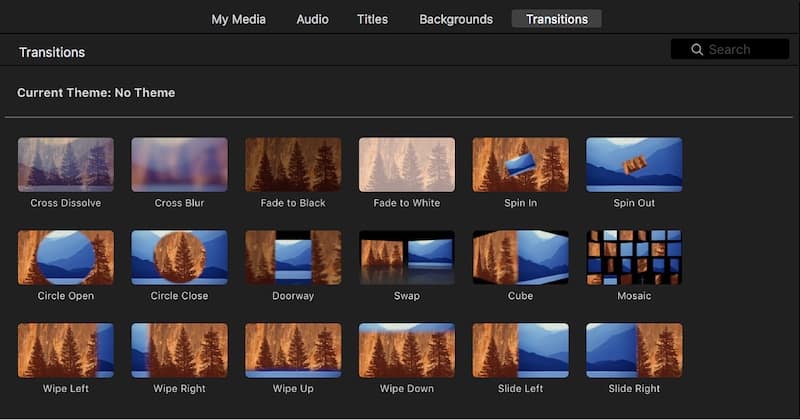
- The Ability to Add Special Effects – You might need features similar special effects, animation effects, transitions, etc. They make your video more than appealing, unique and help you stand out from your competitors.
- The Ability to Add together Background Music – Adding music is essential as information technology can assistance your video appoint the audience on a deeper level, ameliorate the final production, and gives it a professional person affect.
- What You're Using the Software For – Your selection depends on your requirement, the videos you want to edit, and the resources available. Each editor has its own unique features which suit a certain level of users. For instance, yous might prefer Adobe Premiere Elements if you're making professional videos, although it's pricier than other options bachelor.
- Clip Editing – Your editing tool should allow yous to cut clips, brand edits, and reorganize your video sequences. It as well lets yous customize the length of the video without losing any of its content.
- Filters and Colour Correction – Regardless of what y'all're going to edit, y'all should always make sure it comes to life. If you want a video editing tool that adds life and personality, choose the i with correction features and filters.
At present let'south run into how to edit your videos using YouTube Studio, the official video editor for YouTube.
How to Edit YouTube Videos Using YouTube Studio.
You volition probably demand to edit several videos before you go used to information technology all. You can hands edit and upload your videos using YouTube Studio.
YouTube Studio won't let you make avant-garde edits. However, it makes it easy to trim videos, mistiness specific areas, upload and edit a thumbnail, ingather icons, add voiceover and audio, and more.
Follow these steps to edit YouTube videos:
one. Sign in to YouTube Studio.
One time you sign in to your YouTube Studio, caput to the "Content" tab.
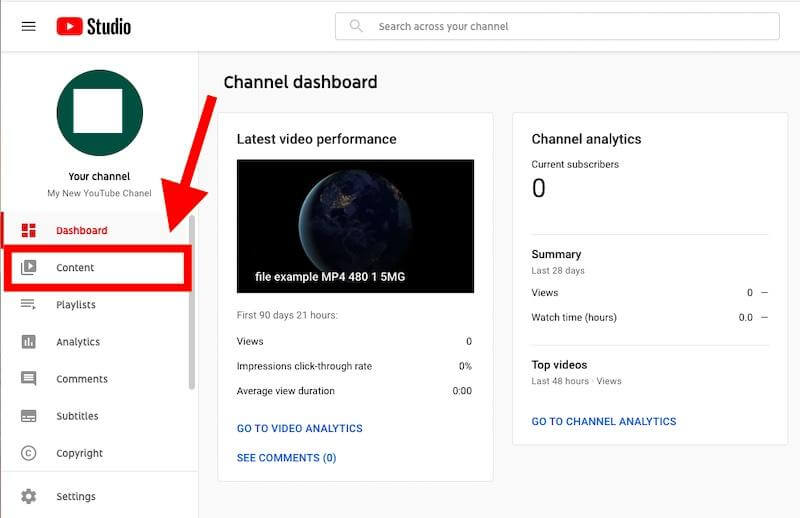
Under the "Uploads" section, either upload videos or select any of the uploaded videos you desire to edit. From at that place, click "Editor" from the left-well-nigh bar.
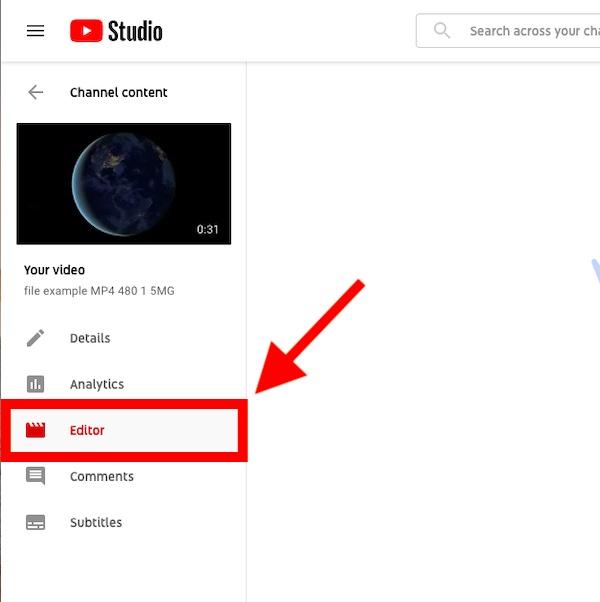
You tin can now edit your video, add end screens, and more than – in i place.
2. Trim Your Video.
Sometimes you upload a video to your YouTube channel, only to find out that it's too long. In that case, you can trim your video correct within the YouTube Studio platform.
YouTube editor lets you lot trim your video from the beginning, terminate, and even from the middle of the video.
To trim your video from the left-most and correct-virtually corners, striking the "TRIM" option.
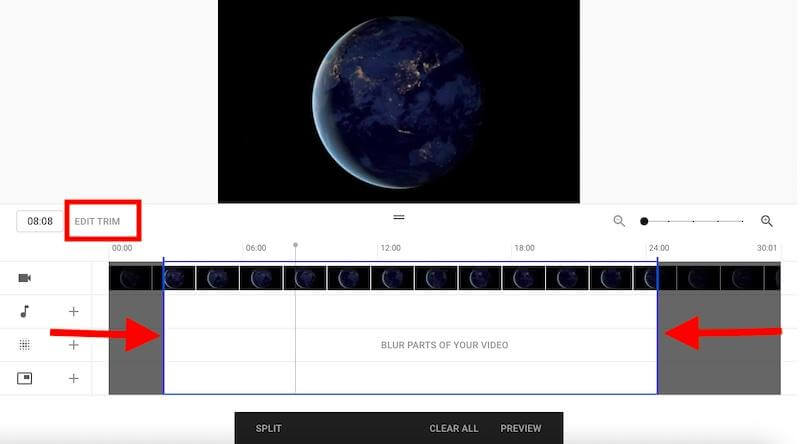
You will have to drag the blueish lines that will appear afterward you select "TRIM" to crop the parts you want to eliminate.
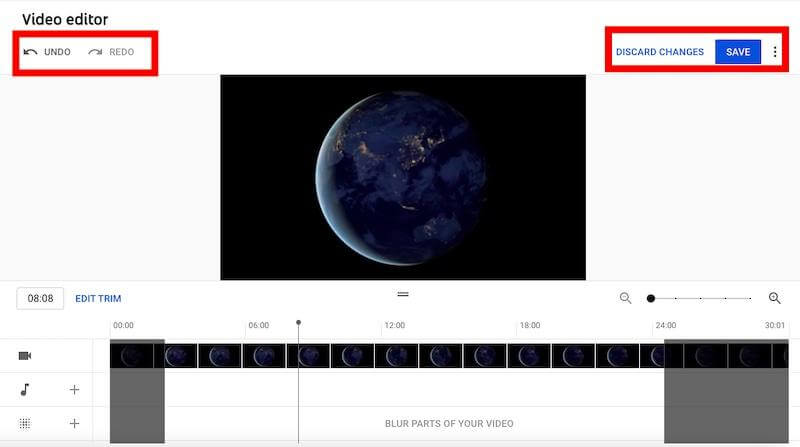
Yous can also Undo or Redo your deportment. Finally, preview the changes and press the "Save" button to save changes or the "Discard Changes" option to revert to the original version.
To utilize only a specific part from the centre of your video, again hit the "Trim" button.
Next, select the portion from the get-go of the video you lot want to remove and select "Split."
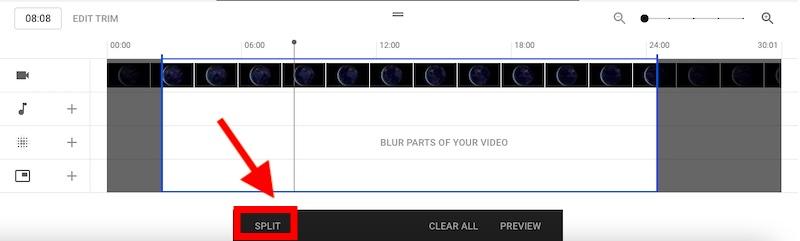
Do the same with the end of the video. That is, select the portion from the end of the video y'all want to ingather and again hit the "Split" button.
Next, drag the blue line from either the beginning or cease of your clip to trim the portion you desire.
Finally, preview and save the changes made.
It might accept a few hours for your changes to apply.
Until your changes get applied to the video:
- The electric current version of the video will be visible to your viewers.
- The YouTube editor won't allow yous to make other changes to the video.
3. Add Music to Your Video.
To add music to your video, click on the "+" sign from the audio console.
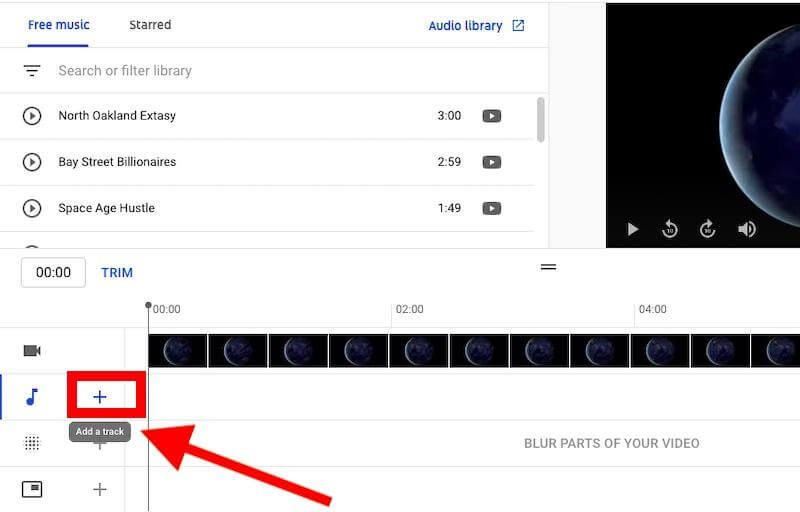
YouTube editor offers an in-congenital audio library that lets you lot download and add audio and sound furnishings to your project. YouTube offers these tracks for gratis.
To add the sound to your video, click on the "Add together" option right adjacent to the music of your selection.
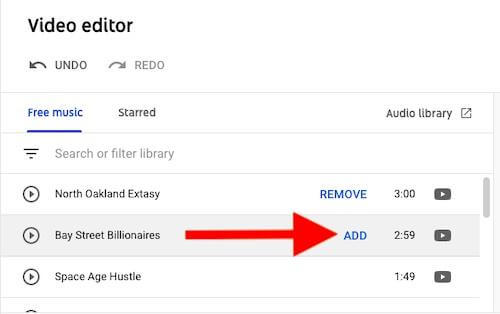
You tin can search the sound catalog by keyword, artist name, song championship, or use filters like genre, mood, duration, etc. Another great news is that YouTube adds new audio tracks every month, so y'all can ever go back and browse the latest music.
4. Blur Parts of Your Video.
Blurring parts of your video tin be helpful if you want to hide personal information or watermark sensitive images then that they don't announced online without the blur.
Luckily, YouTube Studio lets you blur out faces, license plates, logos, work surfaces, private data, and faces of specific people.
Click on the "BLUR" option and select either Face Blur or Custom Blur to proceed. If you cull the "Confront Blur" selection, the editor will automatically discover faces in the video.
Next, click on the faces you want to blur so click "Apply."
If you choose the "custom blur" option, you get to selection custom mistiness shapes and mistiness behavior.
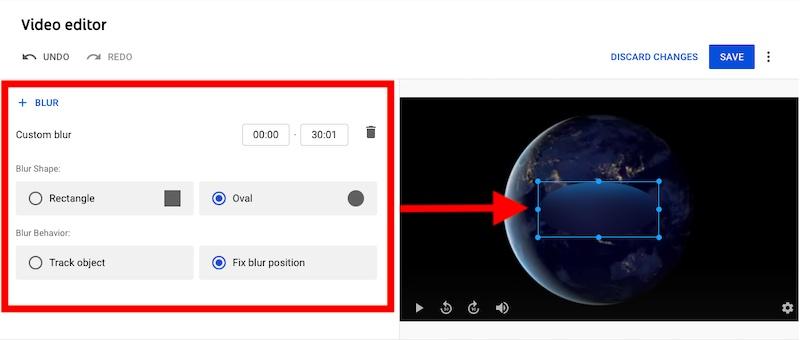
You'll besides see a blueish box above your projection that you lot can select and drag to adjust the blur.
Hither's everything yous tin practice with the YouTube editor mistiness characteristic:
- Move the blurred box – Select and drag the blueish box to a different identify.
- Change the shape – Blur your selected area either in a Rectangle or Oval shape.
- Resize the blurred surface area – Select and drag the box from any end to mistiness a specific area.
- Choose a specific time to make the blurring occur – Set the exact video timeline for the beginning and the cease of the blurring.
- Fix the blur area – You tin prevent the mistiness surface area from moving and make it stay in 1 place throughout the video.
- Mistiness multiple areas simultaneously – Select and elevate new boxes over the parts you want to blur.
5. Add Elements to Your Cease Screen.
Bank check out some of your favorite channels; chances are some videos volition cease with a cheers, about, and subscribe page.
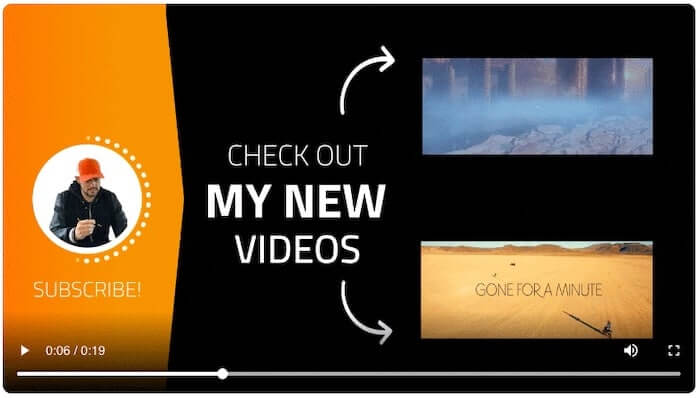
These videos use an end screen on YouTube to encourage viewers to like and share the video also every bit visit the creator's website or view other videos. If done correctly, you can increase conversions on YouTube by explicitly telling viewers what they should do side by side.
You always want your viewers to see your video every bit many times as you lot tin become them to watch information technology. Using an stop screen is 1 way to practise that.
You tin either utilize professional templates provided past YouTube's editor or add elements individually.
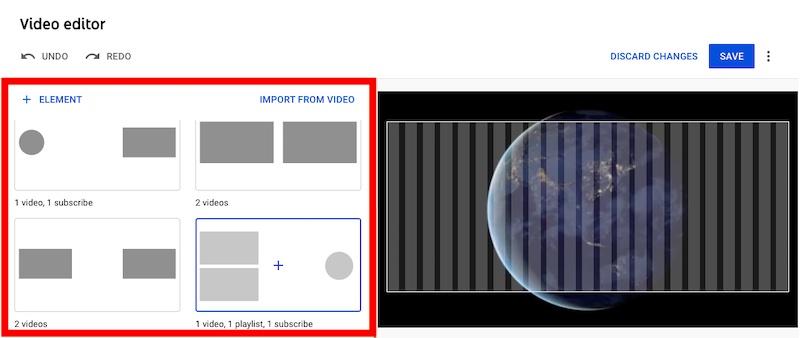
Y'all can add elements similar:
- Videos.
- Playlist.
- "Subscribe" panel.
- Link (you have to join YouTube'south Partner Program outset to add link elements).
In addition, you lot tin can as well mention another channel or a specific video while creating or editing the video championship or description.
Just enter the "@" symbol followed by the channel name you want to mention. Choice the channel you desire to mention from the recommended list.
YouTube allows you lot to mention as many channels and creators as y'all want. The names should autumn within the character limit, though.
6. Add Video Chapters.
Chapters can make your video easier to watch. Chapters are useful for splitting up a long video, making it easier for people to stop and resume watching your video afterwards.
This is especially useful if you want to get into one of your elevation-selling products or services. You can suspension that into bite-sized pieces that tin help the viewer learn about what you have to offer. They likewise serve as a fashion for listeners to increase their conversion charge per unit.
YouTube makes it piece of cake to add together capacity to whatever of your videos in the YouTube Studio.
Sign in to YouTube Studio and then select "Content" from the left sidebar. Select the video that yous'd like to edit.
Finally, click "Show More" and choose the "Allow automatic capacity (when available and eligible)."
You can overwrite automatic chapters anytime by creating your own chapters in the video description.
If yous plan to add together video chapters manually, you'll have to add together timestamps and titles in the video'due south description box.
Keep the following in mind while adding video capacity manually:
- Your first timestamp should start at 00:00.
- Brand sure y'all add at least three timestamps in ascending order.
- The minimum length for video chapters is ten seconds.
How to Edit YouTube Videos Using Apple's Complimentary Video Editor iMovie.
At that place are many video editors available online that you can choose from to edit videos, but about of them price money. Apple's iMovie is one of the near popular free video editor software for macOS and iPhone users.
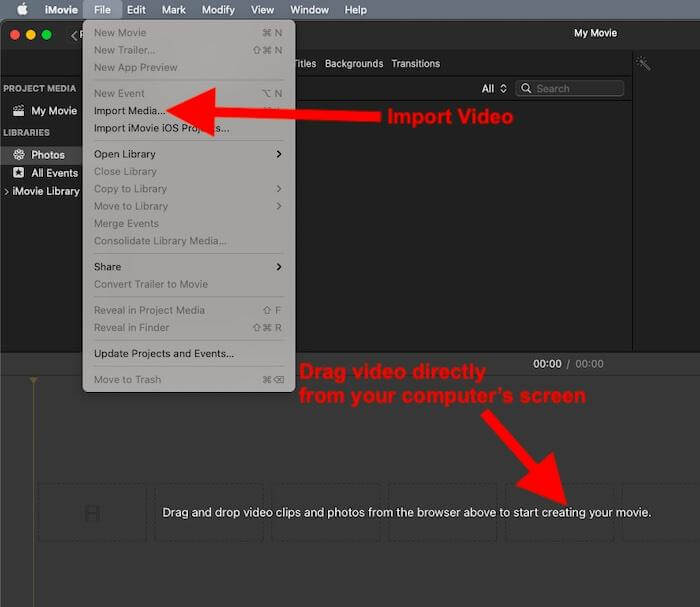
Offset, download iMovie from the App Store and open up information technology on "My Movie" on the main screen. Next, click the Import Media push button and add the video to be edited. Alternatively, you lot tin elevate the clip to the bottom timeline.
You can perform several functions here, including trimming, splitting, adding seamless transitions, and more.
1. Trim and Accommodate Your Clips.
Open your project in the timeline and tap on the clip you desire to trim. You will see a yellowish highlight around the clip.
Adjacent, follow these steps to trim your video:
- Zoom in on the prune in the center of the timeline to see a more detailed prune.
- You can then drag the starting time or end of the clip to elongate or shorten the clip.
- To elongate it, drag the edge abroad from the eye of the clip.
- To shorten it, elevate the edge toward the middle of the clip.
If y'all cannot drag the edge of the prune, in that location might not be an actress video at the starting time or finish of that clip. For instance, if you added a 20-second long clip, y'all won't be able to make it longer than that.
Information technology'south even possible that the clip you lot added is at the shortest length permitted by iMovie, i.e., 0.3 seconds. In that instance, yous can endeavour changing the prune's speed.
Now, follow these steps to adapt your clip:
You can change a particular prune actualization in your movie by changing the sequence of clips in the timeline.
- Open your projection in the timeline and affect and agree the video until information technology rises off the timeline.
- Side by side, drag the video to a different location in the timeline.
2. Split Clips.
While splitting a prune, yous can adjust the duration of each department, go rid of areas you don't need, or include unlike titles to the sections.
Follow these steps to split your video with iMovie:
- Scroll in the timeline and position the white line, i.e., the playhead where yous want to split the prune.
- Y'all tin also pinch open up in the centre of the timeline to zoom in on the clip.
- Tap on the clip and and then on the actions button depicted by a scissor. Adjacent, tap "Split," or you could tap on the clip and and so slice through the playhead on the clip with your finger.
- iMovie places a cut between the ii newly created clips.
You tin can besides add transitions betwixt two clips, have those clips fade in or fade out, zoom into another clip, dissolve into the post-obit clip, and more than.
To add the transitions manually, select the "Transitions" sections from the timeline.
Pick any transition theme you want from the given options.
Do one of the following:
- Adding one transition theme between two video clips – Place a transition theme between two clips in the timeline.
- Adding one transition theme at both ends of a video clip – Select a clip in the timeline, so double-click a transition in the browser.
3. Add together Music and Sound Track.
iMovie provides a broad array of free audio clips that you tin can apply in your project. It has sound effects similar footsteps, rain, and even audio clips like jingles.
- Select "Audio" at the meridian of the browser (on the correct of the Media choice), then go to the Sound Effects option from the left-well-nigh panel.
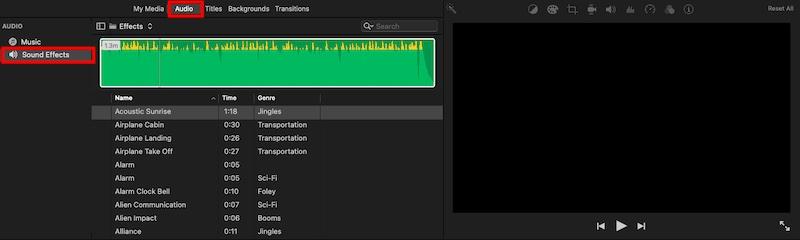
- Hover your mouse over any jingle or sound prune and select the play push button to preview it. You can choose the sound clip, click on the waveform at the pinnacle, and press the Spacebar to preview.
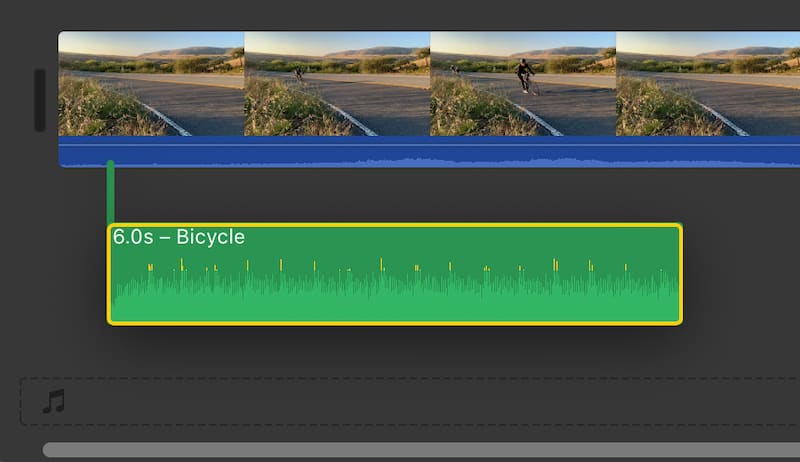
- Finally, drag the audio of your option from the media panel to the timeline at the bottom.
iv. Reduce Background Racket and Utilize an Equalizer Preset.
Video recording is a chip of a tricky business. It's not hard to get a good shot of someone talking to the camera in their office. Simply shooting outdoor scenes adds in sounds like traffic and wind, making editing much harder.
Striking the Noise Reduction and Equalizer push for the noise reduction controls to appear.
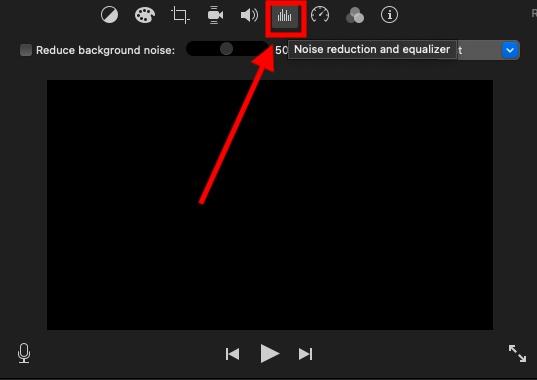
Adjacent, select the "Reduce Background Dissonance" checkbox to adjust the background dissonance.
Y'all can drag the slider towards the right to decrease the background dissonance and towards the left to increase it. Here, the slider at 0% signifies no background noise reduction, and 100% amounts to the maximum reduction.
The same panel lets you apply an blaster preset to enhance or ready your video's audio.
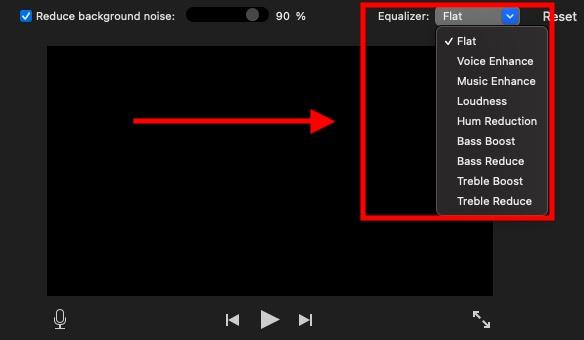
iMovie has plenty of preset options, including Bass Heave, Bass Reduce, Treble Boost, Treble Reduce, and more.
And you'll meet more icons above the video.
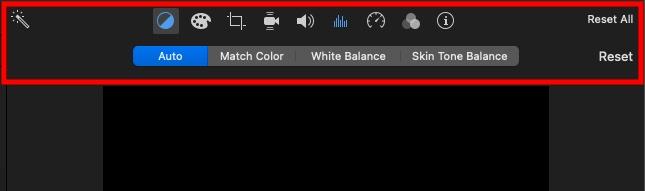
They can help you apply colour corrections, balance your skin tone, apply color residual, crop the clip, change audio volume, stabilize the video, change the speed, sound mixing, sound filters, and more.
How to Edit YouTube Videos Using Microsoft Photos.
While iMovies is for iOS users, Microsoft Photos is one of the best YouTube video editors for Android and Windows users. It also has extensive video editing features.
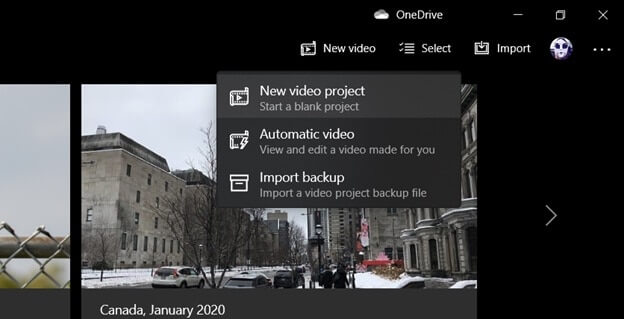
To edit your video file:
- Choose the "Video Editor" mode push or the New "Video button." It volition requite you lot iii options – New Video Project, Automatic Video, and Import Backup.
- To brand it easier, you can choose the video clip thumbnails you want to edit from your Collection view and click Automatic video.
- You can create a moving picture based on a person by selecting the New > Automatic Video pick. The editor volition automatically utilise a suitable theme, add filters, background music, title, and transitions based on the video and its proper name.
- Finally, tap the "Remix It for Me" button to mix them upwardly.
Follow these steps if you want to build your project yourself:
If you want to edit your video manually, select the Video Editor manner instead of the Automatic Video mode. Yous will encounter your previous projects and start new ones.
- Note that the Photos app's video editor is storyboard-based. Once you cull the video, click Add. You lot tin choose it From This PC, From My Drove, and From the Web.
- If y'all select From the Web, it will open a Bing video search with dissimilar categories. Utilize the congenital-in search to add from your drove and choose the content for your video.
- Once you fill the source panel, check the thumbnails and click Place in the storyboard. Yous can fifty-fifty drag them downward to the storyboard.
Now, y'all can perform these deportment:
- To trim clips, use markers to show in and out points. Or slide a selection for the same fourth dimension length on a unlike stretch.
- Use the icons above to add title cards, add text, trim or split clips, apply motion or 3D effects, apply filters, or alter the speed in the storyboard.
- You volition become choices to add groundwork music at the summit.
- You lot volition be able to create videos in portrait orientation and standard sixteen:9 or 4:3 landscape. You tin use a theme with filters (over 13 free filters are bachelor), text styles, and soundtracks.
- If yous desire to use 3D Effects, you create in Paint 3D or go from remix3d.com. It offers 42 prefab 3D furnishings. Yous can even anchor them to moving objects.
You can likewise select an detail from the 3D library when you employ the 3D editor. It has a varied option organized in groups like Animals & Insects, Costumes, Words, Symbols, etc.
Finally, export your edited video content as High (1080p), Medium (720p), and Low (540p).
Executive Summary.
The YouTube video editing industry is getting bigger and bigger these days.
For the user accessing YouTube, that ways a lot of free videos to enjoy and share with your friends and family. But for most YouTubers, it too ways an opportunity to make some extra greenbacks past having a YouTube channel.
I put together the ultimate guide to editing YouTube videos using YouTube Studio, iMovie, and Microsoft Photos. All the same, they are convenient only for basic editing and regular tweaks and enhancements. Get for them if you're looking for a costless app.
Y'all might prefer paid tools similar Adobe Premiere Pro and Final Cut Pro for more than advanced features. These are some of the best video editing apps suitable for editing professional, high-quality videos and tutorials. The practiced news is that they come with a free version every bit well.
There's a lot to learn when it comes to honing your video editing skills, and the process itself can exist overwhelming at starting time.
It's especially overwhelming if yous don't know where to get-go or what tools to use in your editing journey. That's why I too discussed essential features to consider while picking your video editing software.
Looking for other related posts on my weblog?
- Looking for other platforms as well YouTube? Here are my top picks for YouTube alternatives.
- Struggling to create the perfect thumbnails for your videos? Check out my favorite graphic design software tools.
- Trying to detect ways to monetize your YouTube aqueduct? Read my guide for how to make money on YouTube.
Source: https://www.adamenfroy.com/how-to-edit-youtube-videos
Posted by: middletonupostink.blogspot.com
0 Response to "How To Upload And Edit A Video For Youtube"
Post a Comment